Pages

Showing posts with label DIY. Show all posts

Wednesday, February 20, 2013

Homemade Granola Bars


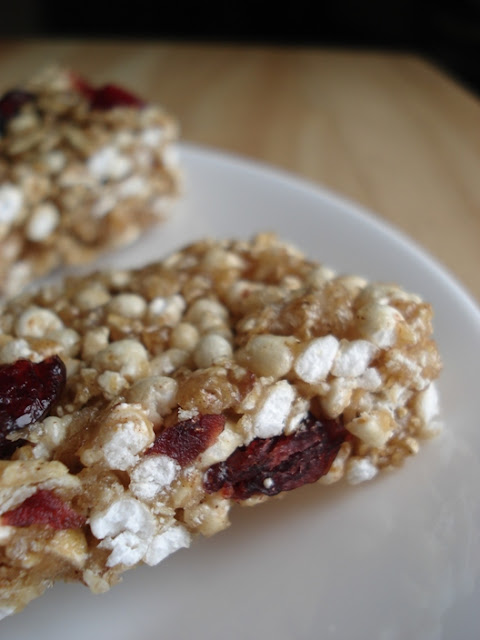
homemade granola bars
Homemade apple-cinnamon-craisin granola bars
Ed likes to take granola bars to snack on at work. We like Kashi brand bars, which we only get at Big Lots, but the prices have gone up even there, so I started making some last year. We're experimenting with different kinds. So far, we've tried apple-cinnamon-craisin and cherry-almond.

homemade granola bars

I got the recipe from this site, but here's my slightly modified short version (there's a lot to read on that site before you finally get to the recipe). They're really quick and easy to make.

No-Bake Chewy Granola Bars
Makes about 12-18 bars, depending on how thick you want them and how you cut them. I make about 12 5"x1.5" bars about 1/2" thick.
  • 1/2 stick butter (4 Tbsp.)
  • 1/4 cup packed brown sugar
  • 1/4 cup honey
  • 2 cups plain granola
  • 1 cup puffed grain(s) (such as rice, millet, or a blend) or cereal (such as Rice Krispies or Kashi 7 Whole Grain Puffs) 
Optional add-in ideas (if combining, adjust quantities so as not to exceed 1/2-2/3 cup total):
  • 1/4 cup raisins/craisins and 1/4 cup chopped dehydrated apple slices with a few dashes of cinnamon
  • 1/4 cup chopped dried cherries and 1/4 cup thinly sliced almonds
  • 1/4 cup mini chocolate chips
  • 1/2 cup any small or chopped dried fruit and/or nuts (apricot, tropical fruit mix, walnuts, pecans, etc.)
  • 1/4 cup sunflower seeds
  • 1/4 cup shredded coconut
  • 1 tsp. flax seeds
Directions:
  1. Line a baking pan/sheet with parchment paper, wax paper, or freezer paper. (I use a 9"x13" baking sheet, but it only takes up about 2/3 or 3/4 of the sheet.)
  2. Heat butter, brown sugar, and honey in medium saucepan to a boil over medium heat, then lower heat to medium-low. Simmer until sugar is dissolved (about 2 min.).
  3. Remove from and turn off heat. Quickly fold in granola and puffed grains/cereal until evenly moistened, and, if using, fold in dried fruit, nuts, spices, etc.
  4. Spread into a baking pan/sheet and press down. Using a spatula or some other flat utensil will help, since it'll be hot.
  5. Optional: Sprinkle chocolate chips on top and gently press in.
  6. Let it sit to cool and harden (I usually wait about 30 min. to an hour or so), then cut into desired size bars/pieces. To store, I wrap them individually in fold-top sandwich bags, so it's easier for Ed to take them to work.
Storage: Keep them in an airtight container in the refrigerator/freezer if you need to store them for a while, so they don't go rancid.
    homemade granola bars

    Friday, October 28, 2011

    Love Cards, Part 2

    Here's the second card I came up with for the heart punch. I used the same red, shiny paper and punched two small hearts for this one.


    I adhered the hearts to the inside of the card so they could show through the circle cutout. I really like this color combination, which is what gave me the idea to make this card. This was so quick and easy to make that I made several of them. I've actually already sent one as an anniversary card (I just added a sentiment).


    Details:
    • packaged cards and envelopes with pre-cut 1.75" circle (Studio G brand from Michaels $1 bin)
    • red foil paper (Martha Steward punch pad)
    • Creative Memories Sweet Heart Maker punch
    • Aleene's Tacky Glue (to adhere hearts to card)

    Thursday, October 27, 2011

    Love Cards, Part 1

    I like to make cards, but I like to keep them simple. I just like the clean look of a simple design.

    I sort of got on a card-making kick this summer. In fact, I made about 100 Christmas cards (will post closer to Christmas), and I actually contemplated starting an online shop of handmade cards/stationery, but I talked myself out of that (for now).

    Anyway, I challenged myself to make different cards with the same heart punch (Creative Memories Sweet Heart Maker punch). The punch actually makes two hearts at once by using the negative space in the larger heart shape to make the smaller one:


    This is one of a few I came up with. I'll post the others separately.


    I got the idea to make this card after seeing a book cover that had the same color scheme. It's a little hard to tell, but the letters are glittered alphabet stickers. It was a pain in the butt to put those on straight and centered (they're still a little off-center), by the way. I've got to come up with a better technique for that if I'm going to use the rest of the alphabet stickers I have.


    This could be used for a wedding, anniversary, Valentine's Day, or just as a love note.

    And because I always want to know when I see other people's cards, here are the details:
    • red cardstock (Stampin' Up Bold Brights), 8.5" x 5.5" (scored and folded in half to make A2 size card)
    • white cardstock (Recollections brand from Michaels), 5.25" x 4"
    • sparkle alphabet stickers (White Blossom brand from Michaels)
    • red foil paper (Martha Stewart punch pad from Michaels)
    • Creative Memories Sweet Heart Maker punch
    • Scotch brand double-sided tape (to adhere white cardstock to red cardstock)
    • Aleene's Tacky Glue (to adhere heart to paper)
    • white copy paper liner (for inside, not pictured)

    Saturday, September 24, 2011

    Catching Up...Frozen Treats

    Sorry we sort of dropped off the face of the earth for a while (we apologize to the five people who actually keep up with this blog). Things have been kind of hectic, which means we have lots to blog about. So, the next several posts will be about some things we've done since the last time we posted.

    So, first we'll catch up on some frozen treats we made over the summer before it gets colder and you don't want to think about frozen things for a while.

    We got a case of mangoes (10 count) for $3.99, so we made some mango sorbet:
    
    
    Mango Sorbet
    

    It was really good and thick (the recipe called for light corn syrup). We also got some limes for 10/$1, so we made some lime sorbet:

    
    Lime Sorbet
    

    We used the recipe we've used for lemon sorbet to make the lime sorbet. It was pretty tart, but good. Although, we like the lemon sorbet a bit more.

    And last, but not least, we made a few batches of coffee ice cream (which was our favorite until the mocha chip idea we posted about before):
    
    
    Coffee Ice Cream
    We made lots of batches of mocha chip in between (and are still making it). Obviously, we recommend investing in an ice cream/sorbet/frozen yogurt maker if you tend to buy ice cream. It'll probably save you some money in the long run and you can experiment with flavors you might not find at the store (and it's slightly better for you--at least, that's what we like to tell ourselves).
    Any suggestions for recipes to try? (We just might try them and post about them!)

    Tuesday, July 19, 2011

    Mocha Chip Ice Cream

    We tried a new (for us) recipe from our Cuisinart ice cream maker recipe book, and it's really good. Most of the ice cream recipes in the book call for whole milk and heavy cream, but we always use 2% milk and half-and-half (milk and cream) instead. It would probably be creamier if we went by the recipe, but we'd rather have less fat, and it tastes good to us. We'll most likely be posting about ice cream/sorbet again soon, since it's summer and we're making it a lot.

    First, we tried a batch of mocha ice cream. It's the same exact recipe, except for without the chocolate chips:
    
    
    Mocha Ice Cream
     
    Mocha Dark Chocolate Chip Ice Cream, fresh out of the machine
    
    We got a sweet deal on the chocolate bars. Valli Produce has them on sale for 89 cents this month, so we've been stocking up on mostly dark chocolate (our favorite). Ed's job is pounding the chocolate bar to make the chips:
    
    One 3.5-oz. bar yields the amount of chips shown
     Mocha Chip Ice Cream
    (makes about 1.5 qt.)

    1 cup milk
    3/4 cup sugar
    1.5 Tbsp. instant coffee or espresso powder (we used instant coffee)
    1.5 Tbsp. cocoa powder
    2 cups half-and-half (1/2 quart)
    1 tsp. vanilla extract
    4-oz. bittersweet/semi-sweet chocolate bar, chopped into tiny, uneven pieces (or same amount of chocolate chips)

    1) In medium bowl, whisk milk, sugar, coffee, and cocoa until dissolved.
    2) Stir in half-and-half and vanilla. (Don't add chocolate chips yet)
    3) Freeze in an ice cream maker, according to manufacturer's instructions. Add chocolate chips during last 5 min. of mixing.

    FYI: We experimented to see if we could eek two back-to-back batches out of our freezer bowl (instead of re-freezing it between batches, which takes several hours), but it didn't freeze at all--it just kept it cold (just in case anyone out there has the same ice cream maker and was wondering). Now we see the benefit in having a second freezer bowl. Maybe we'll pick one up.

    Friday, June 17, 2011

    Blackberry Frozen Yogurt

    Blackberries were on sale for 89 cents/pkg. I almost made a cobbler, but it was pretty hot here when I made this, so frozen yogurt sounded more refreshing.


    I sort of experimented with the recipe, and it turned out well. It was also really easy.

    Blackberry Frozen Yogurt
    (makes 1-1.5 qt)

    about 1 cup blackberry puree (doesn't have to be exact)
    1 32-oz. container of plain yogurt
    1/2 to 1 cup sugar (to your taste)

    1) Make blackberry puree: Puree washed berries (2 containers' worth) in food processor or blender. Strain seeds out with mesh strainer.
    2) In medium bowl, stir yogurt and sugar together well.
    3) Add blackberry puree to yogurt/sugar mixture. Stir until combined.
    4) Freeze in an ice cream maker according to manufacturer's instructions.

    Wednesday, April 13, 2011

    Deep-dish Pizza

    Ed wanted some pizza a while ago, so we decided to make some deep-dish pizza. It turned out very well. The crust was perfect and it was filling. We used a 2-lb. recipe of pizza dough (made in the bread maker on the dough cycle--way easier when you're working all day), but we saved about a third of it to make focaccia. We "topped" it (in this case, filled it) with homemade sauce, ham, cheese, black olives, onions, peppers, and mushrooms.


    One lesson we learned was that sometimes, even though it tastes normal by itself, certain store-brand shredded mozzarella cheese tastes weird when baked. We (well, actually, I'm the only one who seemed to notice/care) confirmed this theory with this pizza, because I previously noticed the weird taste when I made a breakfast casserole (hmm...sounds like a good idea...) with said mozzarella cheese and it had the same weird taste to it. Not sure why, but we've never had that problem with "brand name" cheese. Which kind of annoys me, because you know I'm all about saving a buck. I guess sometimes it doesn't pay off.

    Saturday, April 2, 2011

    Applique Semi-Fail

    I started to sew again recently, and I'm using a book to help me stay focused and re-build my skills. More on the book later. Anyway, one of the "mini-projects" at the beginning of the book is to do an applique. I chose to use an old tank top, in case I screwed up. I didn't want to spend money on something just to ruin it. I took an old scrap of fabric and cut a heart shape out of it. The heart shape was what they did in the book as the example, so I figured I'd give it a shot.

    I used a darker, reddish thread to make the border. I should have used a tighter zig-zag stitch, but I was experimenting with a wider one (see the spaces between stitches?). Turns out you have to do this very slowly to make it look good. Too bad I was impatient and messed mine up.

    
    So, I'm calling this a semi-fail, because the heart-shaped fabric is definitely attached to the shirt, fulfilling the objective, but it doesn't look respectable enough to wear in public (unless it is worn under another shirt).
    Lessons Learned
    • Try a permanent stabilizer (I just used the kind you pin on and it bunched up a bit).
    • Go slower.
    • Use the smallest zigzag stitch available if you want the "satin" look.

     Oh, well. I'll post when I sew something else.

    Thursday, January 6, 2011

    2010: Year in Review

    Since we weren’t blogging in 2010, here’s a quick run-down of what we were up to last year:
    January: Jennifer went on a work trip to Washington, DC, with a side work trip to Annapolis, MD. She can recommend a few good restaurants if you're interested. Ed and his dad went to re-fight WWII at MMP's annual Winter Offensive in Bowie, MD.
    February: Jennifer didn’t get the flu (up until this point, she would get the flu just before Valentine’s Day, like clockwork)! We went to the Wisdom for the Heart banquet on Valentine's Day--always a good time.
    March:  Ed and his dad again went to a WWII ASL tournament, the Bitter Ender, in Raleigh, NC. Jennifer, her mom, and her grandmother went to Myrtle Beach, SC for a women's retreat and had fun together.

    April: We went to Charlotte, NC to see Bill Cosby live. We did a lot of little projects around the house: more canning (pineapple jam), making two rain barrels, starting a garden, and some more baking (bread, pizza, and pretzel rolls).


    May: We finished up the BSF year and stepped down as leaders. We went to the Biltmore Estate and finally got to see the flowers in bloom (until then, we’d only been there at Christmas time, which is nice, but we really wanted to see the flowers). 

    June: Jennifer finished her first (and, so far, only) year of Chinese lessons at work. We went to colonial Williamsburg for the third time in a year, the first time in hot weather (we had to get our money's worth out of our year-long passes!).
    Parade in Williamsburg, VA in June
    
    July: Jennifer went on a work trip to the Dominican Republic. She'll talk a little more about this in the future. Stay tuned. Oh, and we canned some fresh cherries in a light syrup and saw Erwin Lutzer guest-preach at Colonial Baptist Church.

    August: Ed got a new job (yay!) at Aqua-Aerobic Systems, Inc. in Illinois. Before starting his job at the end of the month, he went to Florida to help with some work at his grandmother’s house. We and Alexis also went to a Tears for Fears (TFF) concert (which was super fun) in Charlotte.
    September: The movers packed us up (which feels really weird but is nice when you’re moving that far away) and Jennifer prepped the house to go on the market. Lots of painting and cleaning. Jennifer and Alexis went to another TFF concert over Labor Day weekend in Richmond, VA and got to be in the front-ish row (the “rows” were sort of fluid—standing room only). The next weekend, the girls (Jennifer, her mom, Ed’s mom, and Alexis) went to a theatrical performance of Mary Poppins in Charlotte. The performance was good and we had a good time together. Later in the month, Jennifer flew to visit Ed and unpacked a lot of our stuff (we didn’t know Jennifer would be moving in October back when we bought the non-refundable plane tickets).
    October: Jennifer moved to IL to be with Ed and work her NC job remotely. We went to Ed's cousin's wedding in MI. Jennifer went on another work trip to Miami, FL and met a child star. Ed joined a community band because they had a bassoon he could use.
    November: We got a water softener for our apartment (due to a chunky brewed tea incident...yeah). We canned some kiwi preserves because kiwi were 8/$1; it's really good, by the way. For Thanksgiving, we went to Minneapolis-St. Paul to visit with some friends from our church in NC who had relocated there. We also discovered that Jennifer apparently can handle the drum part on Rock Band.
    December: We went to FL to visit with Ed’s grandmother and her side of the family for Christmas. While we were there, we went to The National Navy UDT-SEAL Museum. After that, we spent way too much time watching movies and shows on Netflix, but we needed some down-time as we recovered from colds (again).
    
    At the beach in Ft. Pierce, FL
    So, those are last year's highlights for us. We are so thankful that God provided for our needs, especially a job for Ed, and that He still is providing.